| | | | | | |
Update Content:
Click here to view Part 2 of the update below (Cabal's Revenge Raid)
Click here to view Part 3 of the update below (Pixie Post)
A quick reminder, supported languages for this update and all future updates include: English, German, French, and Spanish.
| | | | |
| | | | |
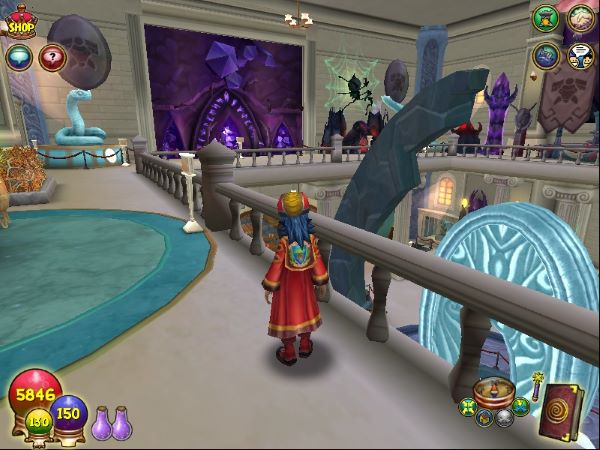
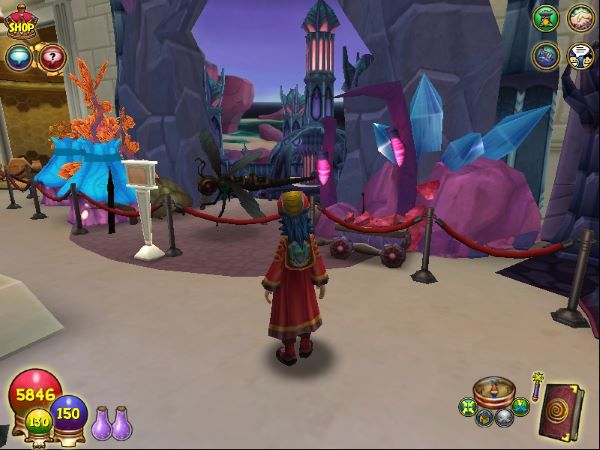
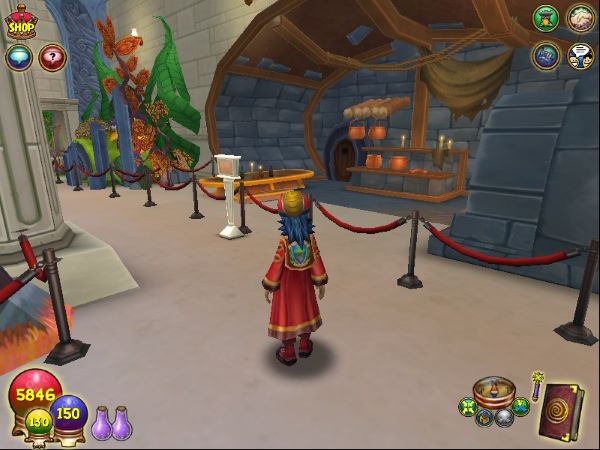
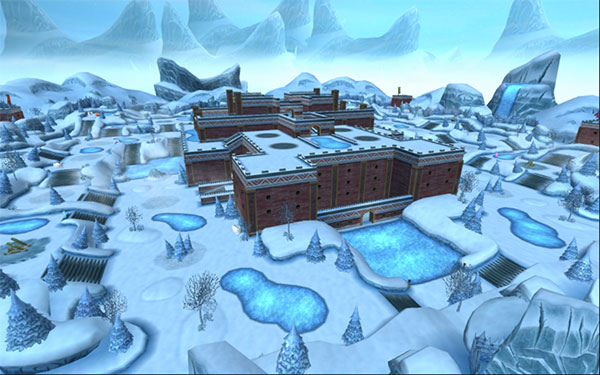
KROKOTOPIA REVAMP
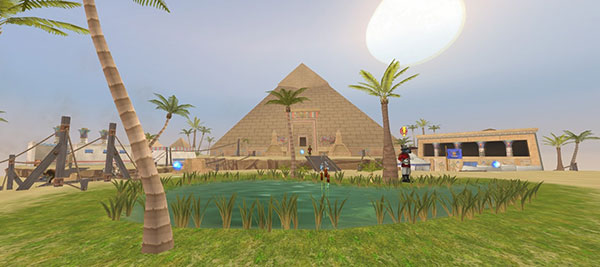
It’s like a brand new Krokotopia for you to explore! Much like the Wizard City revamp, Krokotopia has also been given a graphical update to modernize the look and sound of this classic area. Familiar creatures and monsters have also been given an updated look and up to date animations. Be sure to explore and take in the views as you continue your Wizarding adventure!
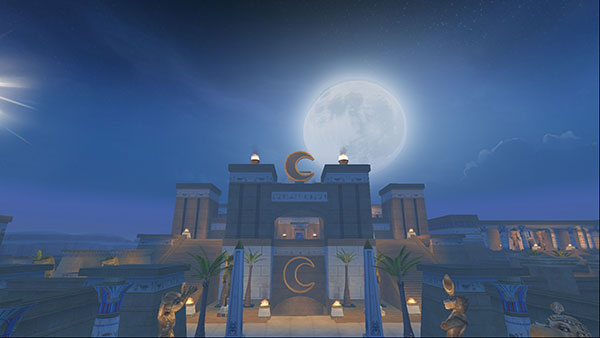
Selenopolis
The Spiral is woven together by leylines, the invisible branches of Bartleby which are saturated in the core elementals of magic; and in some places, through sheer chance, those leylines interweave in unique ways, creating unusual conjunctions of mystical energy. The Blended Grove in Krokotopia is one such place, home to a single Spell Tree with seven trunks, with minds and personalities all their own. It is said this is where the Order of the Fang learned to create Balance Magic and scholars have wondered… what else could be discovered there?
This is, in part, why the city of Selenopolis was built by the mysterious Khonsu. Here, he defended his Mander Lunamaries from the invasive Tuts and maintained his own separate society under the perpetual light of the Moon.
Arc 2 Prologue
You will first find Selenopolis in a new chain of quests triggered after the completion of the Dragonspyre storyline. These quests include formal tutorials for Archmastery and the Magic Wheel, and will smooth the narrative transition into Celestia. From there, Selenopolis and the Blended Grove are your hub for Magic Weaving
Your Story Continues
Additionally, those who have completed Wallaru will find themselves immersed in a deeper conspiracy hidden in this dark city. Many of your old friends from other worlds and other arcs have been kidnapped and brought here. But by whom? And for what reason? The former question, you’ll learn, has many answers, while the latter is as simple as can be: vengeance.
MAGIC WEAVING
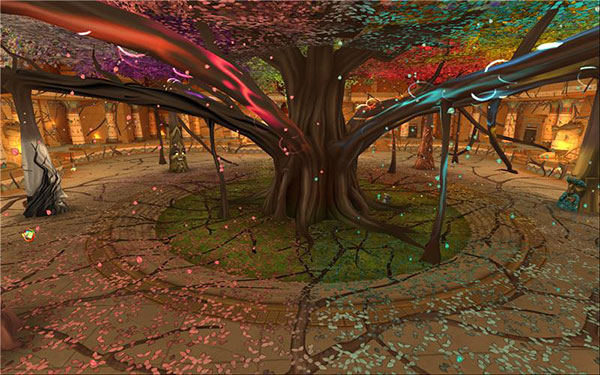
In the Krokotopian city of Selenopolis, you can journey to the Blended Grove and learn about how to weave your school of magic with another by Magic Weaving!
Magic Weaving is a new activity where you select a second school to be your “Weaving School,” and you can then rank up and earn rewards for your unique school combination! You do this by going on quests given to you by your new Spell Tree Trainer in the Blended Grove.
To begin Magic Weaving, you must first defeat Malistaire in Dragonspyre, then Ambrose will send you back to classes to learn about Archmastery, the Magic Wheel, and then Magic Weaving! If you’ve already completed Dragonspyre, Ambrose will see you in his office to fill you in.
Weaving School Selection

Once you’ve completed the tutorials, you’ll be able to select your Weaving School by talking to the tree of your choice. Afterwards, you can talk to the same tree to begin your first quest!
Note: You cannot choose the tree of your primary school.
You can switch your Weaving School at any time, and you’ll still keep your progress for all previous Weaving, but all rewards you’ve earned will be deactivated. If you’ve learned a spell, that will be untrained, and your training points will be refunded. If you’ve gotten a jewel, you will no longer be able to equip it.
Weaving Progression
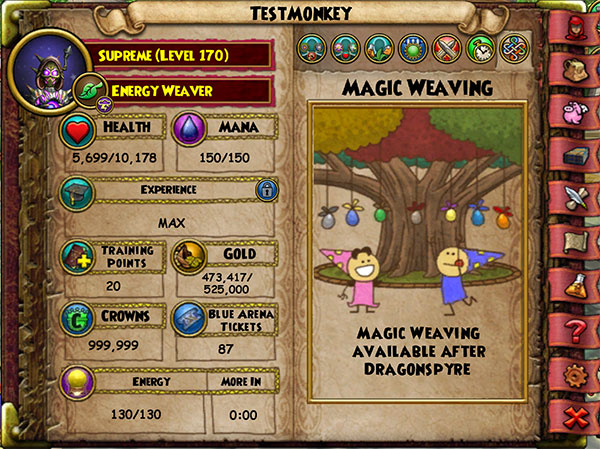
After you select your Weaving School, you’ll notice your title is updated on your character page to match the unique weaving type of the combination between your primary school and weaving school.
Also on the character page, there’s a new tab for Magic Weaving. This is where your progression will be shown. Weaving progression, like crafting, is badge based. Your Weaving Rank increases after completing Weaving Quests, and this page will show your Weaving Rank for all 6 of your potential Weaving Schools.
Weaving Quests
While you’re going through your Weaving Quests, you may notice a few different mechanics than you’re used to...
Badge Quest Goals
To earn your Weaving Ranks, you must complete some badges around the spiral. Some badges require you to defeat some enemies, others require you to fish, and some require you to help others. These badges are unique in that you cannot make progress on these badges unless you are either on the quest or have completed it.
Mainline Helper Badges
One of these badges to obtain will require you to help some friends. To earn progress, you must be in an Adventure Party Group or a Guild Group with a wizard questing in the specified worlds. You will earn badge progress for each mainline quest that your group members complete.
Optional Quest Goals
It’s very important that you read the “Tome of Weaving” when your quest tells you to do so, as this will tell you what tasks you need to complete and how many. Sometimes you’ll only need to complete 3 of the 5 tasks you’re given. If you ever forget what you should be doing, don’t forget you can always click the “Review Dialogue” button to re-read your tasks.
Have __ Defeat Goals
Some quests will require you to play the support role as you assist your accompanying companion to defeat your enemies. The quest goal will not advance until the companion is the one to deal the final damage to the opponent.
Weaving Rewards
As you’re ranking up, you’ll earn different rewards depending on the school you chose to Weave with. You will always gain one of these 3 reward types...
Spell - This will be a spell, like any normal trained spell, that will cost a training point and it will also help you with both your primary and weaving schools.
This will be a spell, like any normal trained spell, that will cost a training point and it will also help you with both your primary and weaving schools.
Equippable - This could be in the form of a Jewel, Gear piece, Pet, Mount, or anything else you can equip to your character.
Fusion Formula - Described below, this will allow you to combine spells from your two schools into a new, powerful spell that is unique to your weaving combination.
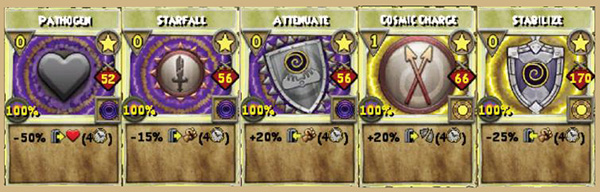
All Spells from Magic Weaving have uniquely colored borders that show your school's color in the top left half of the card, and your weaving school's color on the bottom right. Remember, the school icon in the top right corner of the spell is what determines the pips and stats used when casting the spell.
SPELL FUSION
Spell Fusion is a new combat system where every card has the potential to be combined with another spell to make powerful new spells! Here’s how it works...
Fusion Formulas
In order to use Spell Fusion, you must first learn a Fusion Formula. A Fusion Formula defines two spells that, when fused together, result in a new spell! You can learn a Fusion Formula the same way you would learn a spell.The trainer shows you the Fusion Formula’s result as well as the two spells that are required to create it. You must train a Fusion Formula before you are able to use the combination in combat.
Adding Fusion Spells to Your Deck
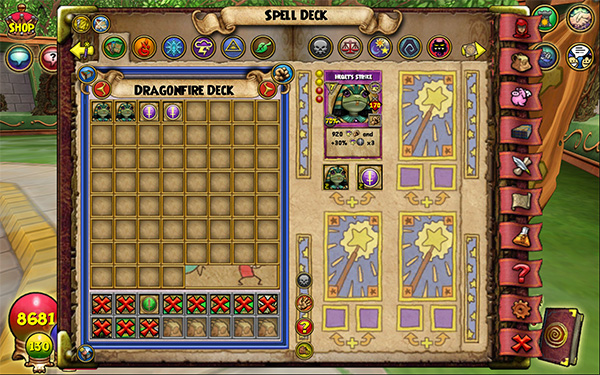
To use a Spell Fusion, you simply need to add at least one copy of both component spells into your deck. The number of copies you’re allowed to fuse is only limited by the copies of the components. Additionally, once you’ve learned at least one Fusion Formula, there is a new tab that will allow you to view which ones you have trained. From here, you can click on the resulting spell to add one of each component spell into your spell deck.
Spell Fusion in Combat
Once you’re in combat, your spells will start to glow in different ways if they’re involved in a Fusion Formula you have learned.
 No Glow – This means your deck does not have the other spell necessary for this Fusion.
Yellow Glow – This means your deck has both necessary spells, and the highlighted spell can be used in a Fusion. The other spell for this Fusion is not in your hand yet.
Green Glow – This means both spells of your Fusion Formula are in your hand and you’re ready to Fuse!
To Fuse two spells, you simply select one spell, then the other spell. After the first spell is selected, the other spell will be the only spell highlighted, but from this point, you can also choose to cast the selected spell using its normal targeting if you have enough pips to cast it. You can select the Fusion component spells in either order.
If one of the component spells typically casts after a single click, like an AOE, it will require an additional click only if there’s a Fusible spell in hand. Otherwise, it functions normally.
Once spells are Fused, they are both removed from your hand and your discard pile. The Fused spell then acts as any normal spell would. You can enchant it or even use it in another Fusion. If you discard or cast the Fused spell, it will be added to your discard pile, which can later be reshuffled.
Fusion Component Spell Rules
- Treasure Cards can NOT be used in Fusion
- Any tier of any spellement path can be used in Fusion
- Any pet or equipment spells that share the same name as the component spell can be used in Fusion
Once you learn your first Fusion Formula, you can visit Diego the Duelmaster in Unicorn Way and he will guide you through fusing spells!
NEW SPELLS AND SPELL CHANGES
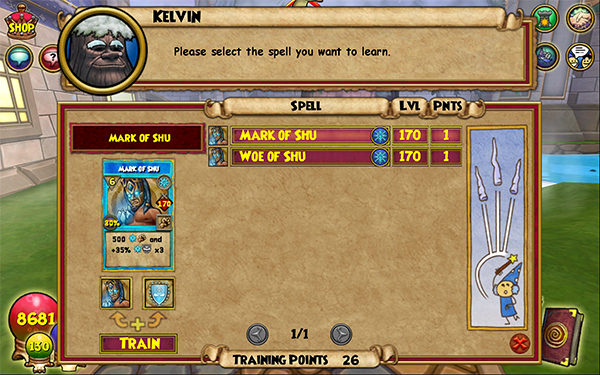
New Selenopolis Spells
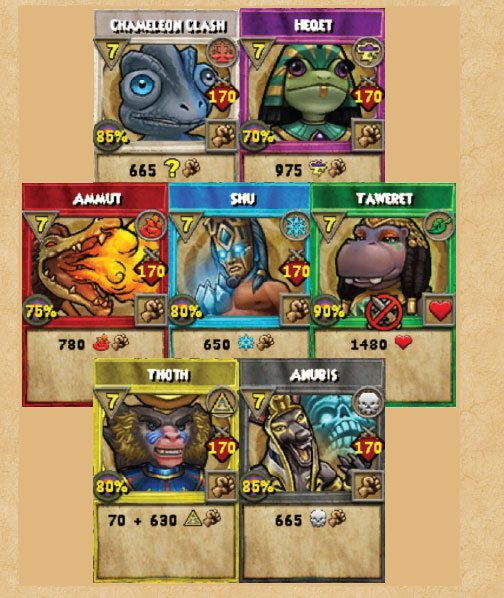
With Selenopolis, each school gets a brand new single-target spell for 7 pips that is themed with the gods of Egypt. These spells are earned through all new spell quests! Spellements for these spells will also be given as you quest through Selenopolis.
In addition, each school gets 2 new Fusion Formulas that use the Selenopolis spells, when combined with hanging effect, creates a new hit and utility spell! See the Spell Fusion section for more information.
New Star Spells
New Aura Spells are becoming available to train from level 52 to 170! A few of these auras have a new spell type, Harmful Aura, which has negative effects and can be cast on an enemy. Only one Aura can be active on a combatant at one time, and Auras will replace each other when cast.
Other New Spells

Some additional spells have been added to the Ravenwood professors for schools that had some spells banned from Advanced Combat this update.
Additional Spell Changes
- All Novus and Wallaru spells have 1 additional spellement tier
- All healing reduction effects, like Infection and Doom and Gloom, have increased from 50% to 65%
- Scarab, Scorpian, and Gearhead Destroyer now have split paths to swap different effects
- Locust Swarm's bottom path now echoes Harmful Wards rather than swapping them
- Removed protection from bottom path of Celestial Intervention
- Triton's bottom path now always results in Storm Blades
- Troll's bottom path now gambits a Helpful Ward for a second detonate rather than an increased % on the first Detonate
- Cyclops' bottom path now results in 2 Damage Traps rather than 3 DOT Traps
- Drop Bear Fury's bottom path now results in a Fire DOT rather than a Myth DOT
- Eye of Vigilance and Righting the Scales changed from Balance to Shadow spells and can be used in Standard Combat
- Lore Spells that had no available path for Advanced Combat were given an additional path. This includes Deer Knight, Ratatoskr's Spin, Ship of Fools, Reindeer Knight, and Winter Moon
- The following spells have been banned from Advanced Combat: Manaburn, Supernova, Shift, Snow Drift, Leviathan's top path, and Skeletal Dragon's top path
BAZAAR REVAMP
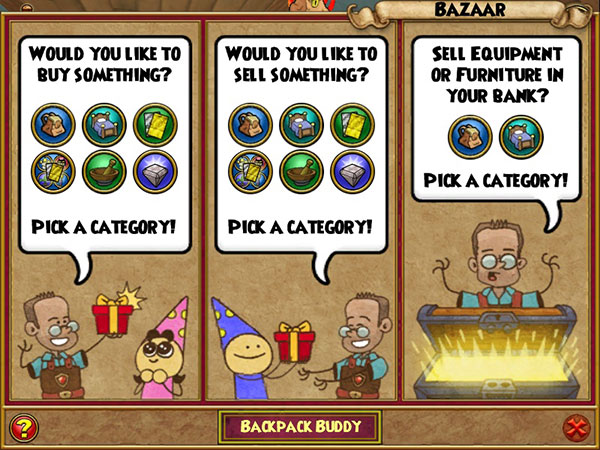
The most important shop in the spiral received a makeover!
- The bazaar now has a front page. From the front page you can jump to any section of the bazaar directly.
- The delay when the updating bazaar inventory has been removed.
- Two new pages, one for Jewels and one for Activity Treasure Cards (Monstrology, Gardening, Castle Magic and Cantrips) have been added.
- The Reagent page now has filter buttons for different kinds of reagents.
- The Equipment page now defaults to Usable and Level Descending.
- Buying and Selling now share a common appearance.
- You can use category arrow buttons to move either left or right.
- The Equipment page has a Filters Button that allows you to sort by
- Usable – Equipment that your character can use.
- No Stat Gear – Show cosmetic gear.
- Affordable – Equipment that you have enough gold to purchase.
- Owned – Filtered out equipment that is in your backpack.
- Each page allows you to search for items by name.
- On sell pages, if you select Add No Auction, you can sell No Auction items as if you were at a regular shop (the items aren’t added to the Bazaar and the price is what a regular shop would offer.)
There’s a new option when buying bazaar equipment - Equip After Purchase.
If you Equip After Purchase, then the equipment that you purchase will be equipped. The Bazaar will offer to buy the item that you had previously equipped, if it’s auctionable.
BACKPACK BUDDY
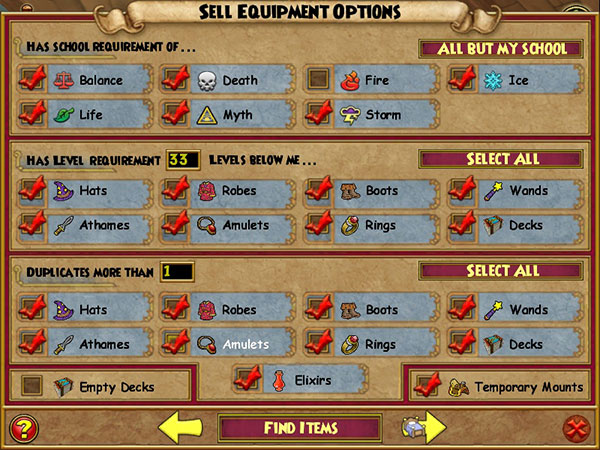
The Backpack Buddy is a new Bazaar service that quickly finds and sells items in your backpack that you don’t want.
How to use the Backpack Buddy:
- Set up rules for which items you don't want. Use the right and left category buttons to page though the Sell options.
- Click the Find Items button.
- Review the items in your backpack that met the rules you set.
- Click the Sell Items button to sell them.
Notes
- The Backpack Buddy options are saved locally to your computer so you can use them the next time you have items that you don’t want.
- All of the Backpack Buddy options default to off. No items will be sold unless you enable some options.
- Backpack Buddy does nothing with Locked items.
- Auction-able items are sold to the Bazaar.
- Non Auction-able items sold are to a shop.
- If selling items makes your character exceed the maximum amount of gold that you can carry, any additional gold is lost.
General Options
- Sell Crowns Items – If checked, the Backpack Buddy will find Crowns items that meet your sell rules.
- Sell No Auction Items - If checked, the Backpack Buddy will find No Auction items that meet your sell rules. These items are sold to a shop.
- Sell Stitched Gear - If checked, the Backpack Buddy will find Stitched Gear.
- Sell Cosmetic Gear - If checked, the Backpack Buddy will find gear without stats that meet your sell rules.
- Sell Items with Jewels - If checked, the Backpack Buddy will find gear with jewels.
Equipment Options
- Sell Equipment by school requirement.
- Sell Equipment that has a level requirement some number of levels below your level by the school of the gear.
- Sell duplicate Equipment. You can select how many duplicates to keep and which types of equipment to sell.
- Sell Empty Decks – Sell decks without any spells or treasure cards.
- See Temporary Mounts – Sell mounts that are not permanent.
Furniture Options
Sell All Furniture by category:
- Keep Skeleton Keys – Don’t sell Skeleton Keys even if All Wall Hangings is selected.
- Keep Quintescent Cores - Don’t sell Quintescent Cores even if All Decoration is selected.
- Keep Guild Gate Keys - Don’t sell Guild Gate Keys even if All Wall Hangings is selected.
- Keep Gauntlets & Dungeons - Don’t sell Gauntlets & Dungeons even if All Outdoor is selected.
- Keep Socket Wrenches - Don’t sell Socket Wrenches even if All Wall Hangings is selected.
- Keep Crown Seeds – If this isn’t selected and All Seeds is selected, Crown Seeds will be sold even if the general option Sell Crowns Items is selected, Basically, this gives you a way to sell Crown Seeds and not sell other crowns items.
See Furniture duplicates by category - Select how many duplicates to keep.
Treasure Card Options
- Sell Treasure Cards that can be bought at the Wizard City Library, by the Treasure Card’s school.
- Sell duplicate Treasure Cards by the Treasure Card’s school. You can select how many duplicates to keep.
- Sell All Gardening Treasure Cards.
- Sell All Castle Magic Treasure Cards.
- Sell All Cantrip Treasure Cards.
Jewel Options
- Sell All Jewels by school
- Sell All Pins by school
- Sell duplicate Jewels. You can select how many duplicates to keep.
- Sell duplicate Pins. You can select how many duplicates to keep.
- Sell All Derby Jewels
- Keep Best Health/Mana – Sell all but the best Health and Mana jewels.
- Sell Jewels and Pins by Effect
- Block
- Critical
- Health
- Mana
- Accuracy
- Flat Resist
- Flat Damage
- Incoming Healing
- Outgoing Healing
- Jewels that Give a Spell
Sell Confirmation

The items that met one of the options that you selected are displayed. You may unselect any items that you don’t want to sell. Click the Sell Items button when you are ready. You may also click the Go Back button to change which options are selected or click the Close button to quit.
When you click the Sell Items button, a final summary of how many items you’re selling, how many Crowns Items you’re selling, how many No Auction items you’re selling and how many Stitched Items you are selling is shown. Click Yes to sell these items from your backpack.
TUTORIALS
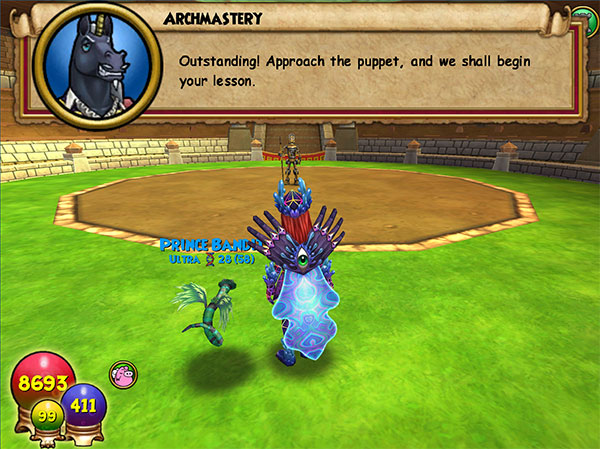
In the wake of your victory against Malistaire, it seems you’ll finally have the time to return to your studies on the foundations of magic! We have two important classes for you to attend.
The first, taught by Diego the Duelmaster, will teach you the methods of Archmastery to channel your energy into Pips of a specific school! You’ll learn how to use School Pips to cast more powerful spells from other schools and meet more specific spell costs.
The second explores the complex relationship between types of magic and how the tactics of each school support and conflict in a pattern called the Magic Wheel. This class is taught on-site at the Blended Grove by guest lecturer Raafat the Teacher, and includes a tour of the Grove. These quests include an introduction to combat cheats, formal tutorials for Archmastery and the Magic Wheel.
If you’ve already moved on to exploring Celestia, you can pay a visit to Headmaster Ambrose and he’ll be happy to put you on the class schedule!
NEW BEASTMOON FORMS
New Beastmoon forms are here, each bringing unique abilities and strategies to the arena!
Storm Fairy
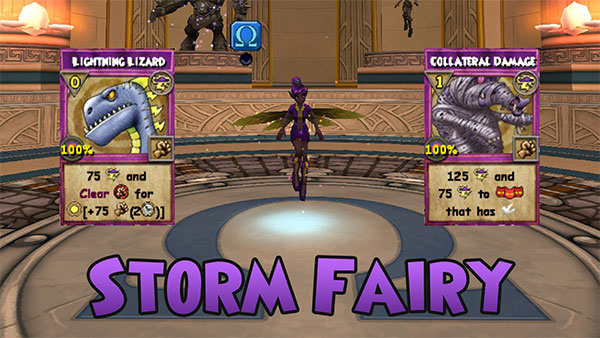
Prepare for the powerhouse that is the Storm Fairy Beast Form. She has new mechanics that punish Pacified players and others that buff herself and teammates in new ways.
Myth Elf
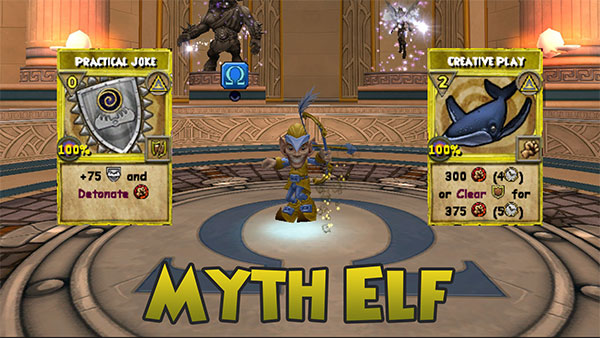
Myth Elf is a force to be reckoned with. He has spells that work well with Fire teammates, dealing massive amounts of over time damage and increasing damage even more with traps.
Life Ninja Pig
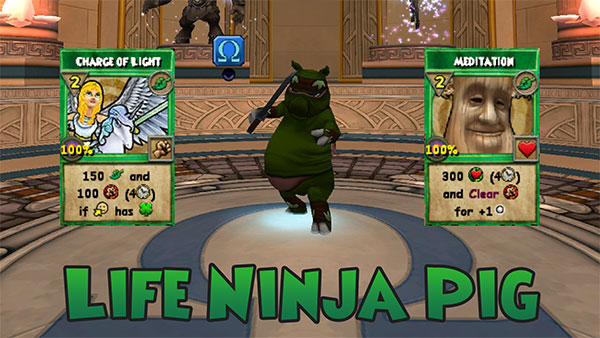
The Life Ninja Pig heals in unique ways and strongly synergizes with Fire’s Damage Over Time spells. This form is also a strong punisher of Myth’s traps.
Fire Krokomummy
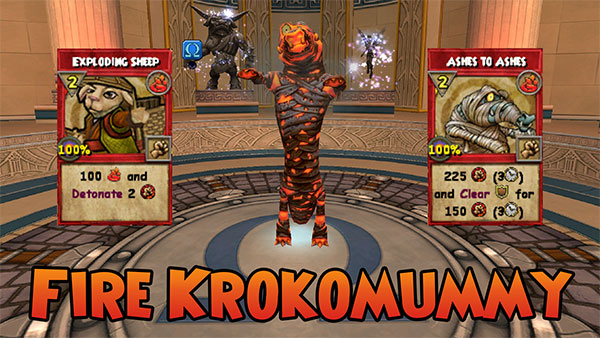
With molten hot skin, this Fire Krokomummy manipulates Damage Over Time effects like none other. Pair this Krok with a Life form for maximum damage.
Balance Colossus
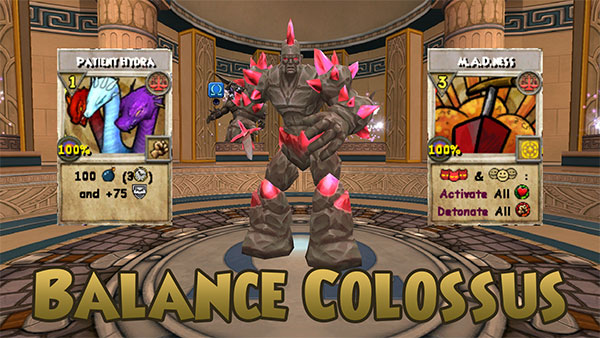
Balance Colossus pairs two effects that typically don’t last long when used together, DOTs and Traps. However, he gets around this by being the first Beastmoon Form to add deferred damage over time spells. Don’t let him lure you into a false sense of security though, he can detonate like no other form.
MARK AND RECALL CHANGES
Here at KingsIsle, we've been experimenting with making magical teleporting less magically expensive.
- Mark now costs 1 mana, if you have less than 50 mana. It costs 5 mana, if you have less than 100. Otherwise, it costs 10 mana.
- Recall now costs the same amount of mana as Mark to use.
- The Mark is no longer removed when you Recall to it.
- There is a Mark button in the lower left corner of the dialog window whenever you can accept a quest.
CROWNSHOP CHANGES
The new and improved Pack Preview now shows all items available from a pack, instead of just up to 8 hand picked items, along with it's rarity. Since this list is now generated mathemagically, it shows all the items your wizard can pull (based on level, school etc.) Some packs will now have Featured items which are hand picked items that are brought to the front of the preview list.
There is now also an inspect icon on second chance chests that allow you to view all possible items in a second chance chest.
The background on the second chance chest view will change to make the Rarity easier to read in a later update.
Khrysalis Guild Museum Gallery
A new gallery has been added to the Guild Museum. The Khrysalis Gallery can now be unlocked with the help of players in your guild. Speak to Ian Celtus on Museum Island to get started.
See the Wallaru Patch Notes for an explanation on how a Gallery in the Guild Museum works.
BUG FIXES AND MISC. CHANGES
Misc
- Certain ultra rare gear sets in Dragonspyre, Khrysalis, Lemuria and Novus are now auctionable
- Several Maycasts have been banned in PvP only
- Angelica Windspar has 4 new housing teleporter recipes
- Angelica Windspar has recipes for 4 new XL Regal Castle Blocks
- The brightness has been reduced on all Regal Castle blocks
- Options for Water Mole Tropical Resort and River Palace were added to housing signs
- Kit10 pet sounds have been improved
- Several graphical and animation fixes
- Several UI and name and text adjustments
- More spell changes coming soon
- Certain gear sets where the lowest tier set was level 5+ have been changed to any level
- Fixed a bug in several gear pieces that were giving duplicate stats
Badges
- Extra Credit badges no longer appear as non-Extra Credit on the leader board
- Way of the Ninja Pig Badge is now obtainable for everyone
- Fixed Booger Boxer badge to award when expected
- Lemuria side quest badges now include Zeke and Eloise quests
Advanced Content
- Fixed Tse-Tse's Elephant form to always cast his blades
- Adjusted Plague Oni in Jade Oni Rematch to check for Harmful Charms before casting his Oni hit
- Adjusted Voracious Void Raid to remove Stuns and confusion
- Adjusted Divine Cabalist fight for Chromatic removal
- Fixed invisible hanging effects in Cabal's Revenge Raid
Beastmoon
- Updated descriptions of Hasty Harvest TC to help describe functionality
- Removed Hasty Harvest TC from Mayhem rewards and increased idol drops
- Fixed Golem Taunt spellement recipe to detect TC properly
- Confounding Fiend no longer attacks twice
- Fixed card text of Scouring Sand II
Other Combat
- Meowiarty Rematch properly stuns on turn 1 in Standard Mode
- Fixed bottom path of Fire Elf to not show attack three times and Spinysaur bottom path to show attack
- Fixed bottom paths of Blizzard, Meteor Strike, and Humongofrog to deal the expected amount of damage
Drops
- Added gear to Standard Mode of Hall of Heroes
- Re-added to the Basilica cantrip to Malistaire in Dragonspyre
Other
- Fixed badge requirements on Umbra Queen's shocked Garment recipe on Raquel
- Disloyal Knight in Avalon is now extractable with Monstrology
- Added Favorites Tab to Cantrip UI
- Added Cabal's Revenge Raid to Guild Achievements
| | | | |
| | | | |
Update Content:
| | | | |
| | | | |
CABAL'S REVENGE RAID
Some feuds can never die. For all the villains you’ve faced and monsters you’ve defeated, there is one for whom hatred of “The Wizard” has become so potent they will warp reality itself to see their vengeance satisfied. And they brought along some of the Cabal to help them. Not every member of that organization was happy about recent developments and they have gathered at an abandoned fort in Polaris to make their displeasure known.
Rally your Guild and prepare for your greatest challenge yet: facing off against not just one, but TWO, raid bosses! They are joined by familiar foes and evil twins, as the Cabal makes their last stand. They say revenge is a dish best served cold, but it is also best served to only level 170 players in coordinated Guilds ready to face the toughest obstacles Wizard101 has to offer.
Speak to Gwyn Fellwarden in Dun Dara, Avalon to begin the Cabal’s Revenge Raid!
PVP TOURNAMENTS UPDATE
Official Tournaments
We’re kicking things off with the return of Official Tournaments! One of the key changes is that Tournaments will no longer be available at any time of day, any day of the week. Instead, we want to build excitement around upcoming Tournaments for the players and spectators. We have a lot of exciting changes coming this Summer – as well as in future updates. If you’re excited to test your PvP prowess in Tournaments – read on!
Tourney Tokens
The first change we’d like to discuss is the introduction of a new in-game currency that you will use to register for all tournaments: Tourney Tokens. You can get Tourney Tokens from a variety of free-to-play sources including the PvP Battle Pass, and occasionally from other loot sources. And if you do well enough in your Tournaments, we’ll give you Tourney Tokens back, so that your next Tournament entry is paid for! During Test Realm, you can purchase Tourney Tokens on Hephaestus for the price of one Cat Tail.
New PvP Rewards
Tournaments will reward you with gold, blue Arena Tickets, or even better rewards. Since we expect a little more hustle and bustle around the PvP vendor, we’ve added some new rewards, and will continue to refresh the rewards often. Most of the rewards from past Ages are still available via Roland Silverheart, who will accept blue Arena Tickets that you can earn via 5th Age Ranked and Tournament play.
Please note that this will be your last chance to redeem the red Arena Tickets from past Ages. We will be removing those rewards from Brandon Mistborn soon, at which point you’ll need to earn blue Arena Tickets if you want to pick them up.
Speaking of PvP rewards from past Ages – you asked, we listened! We have created a new, updated texture variant of the former Commander gear (for both boys and girls) and you’ll be able to earn that beloved stitch gear by participating in tournaments.
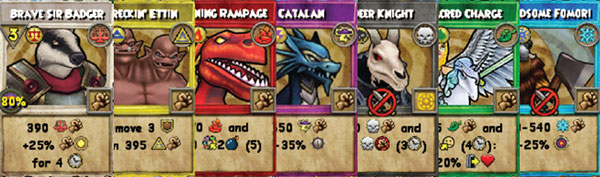
NEW LORE SPELLS AND PACK UPDATES
Five new Lore Spells are coming for the schools of Fire, Ice, Death, Myth, and Balance! Two of the lore packs and their associated Gold Skeleton Key Bosses have been updated to drop new Spellements and new gear! Each of these Key Bosses also has a new Reagent they will be dropping and an associated Gear Crafter outside their sigils.
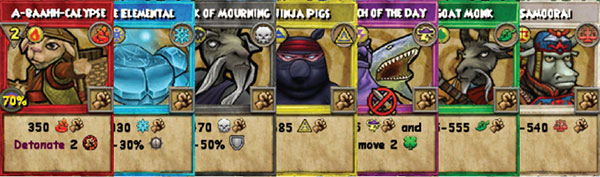
Ninja’s Spellemental Pack – Takanobu the Masterless – Cave of Solitude, MooShu
- Fire – A-Baahh-Calypse – 350 Fire Damage and Detonate 2 Damage Over Times
- Ice – Ice Elemental – 330 Ice Damage and add –30% Universal Weakness
- Storm – Catch of the Day
- Myth – Ninja Pigs
- Life – Goat Monk
- Death – Monk of Mourning – 470 Death Damage and add –50% Universal Shield
- Balance - Samoorai
Knight’s Spellemental Pack – Lambent Fire – Crystal Caves, Avalon
- Fire – Burning Rampage
- Ice – Handsome Fomori
- Storm – Catalan
- Myth – Wreckin' Ettin – Remove 3 Positive Wards then 395 Myth Damage
- Life – Sacred Charge
- Death – Deer Knight
- Balance – Brave Sir Badger – 390 Balance Damage and +25% Universal Damage Aura for 4 Rounds
BOSS REMATCH REBOOT
Boss Rematches are back! Not only are Arc 2 rematches newly available, but many other improvements have been made to the system to broaden the appeal and reach of these combats.
In case you haven’t seen these before, Boss Rematches are 1-time use Housing Items that contain single fights where you face the final bosses of each world, and sometimes these villains recruit some other creatures from iconic encounters throughout the world they’re from. These villains are more difficult than when you fought them before, so gather your friends to help take them down once and for all! To create a Rematch, harvest some reagents in the world you’d like to craft, then visit Raquel in the Arena or your world’s local housing vendor. After your first attempt, the rematch object becomes cheaper to craft.
Standard / Challenge Mode
Previously only available in Challenge Mode, players now have the option to select between Standard and Challenge Mode before they enter the sigil. Both modes are based on the highest level of the Arc, so Wizard City through Dragonspyre are all Level 50 and Celestia through Khrysalis are all Level 100. If you’re higher than these levels, do not fret, you can join in the fun too! You can fight in Standard mode using your current level's stats and spells at no cost to you, but if that’s too easy for you, try the Challenge Mode where you will be scaled to the level of the Boss and will have to put your combat skills to the test. Like other Challenge Modes, you will receive a Gold Skeleton Key for your first victory!
Morganthe Saga (Arc 2) Rematches
Morganthe and her Umbra Legion are preparing to take you out once and for all, in combats that keep you on your toes and combine enemies as you’ve never seen before.
Celestia – Mithraya Rematch
Mithraya is joined by her fellow guardians of Astral magic, Ptolemos and Astraeus, who all wield Sun, Moon, and Star magic stronger than the wizard ever has.
Zafaria – Tse-Tse Snaketail Rematch
Tse-Tse is a master of disguises. Joined by some Mirror Lake creatures, Starburst Spider and Goliath Bruiser, Tse-Tse will try to confuse you with his disguises. You’ll have to prepare, for each disguise presents a unique challenge.
Avalon – Pendragon Rematch
Accompanied by the White and Black Dragons, Pendragon limits your spells in ways that they think lock you up, but with some calculated targeting, you may just find their weakness. Guilds who have completed their Avalon Gallery will already be familiar with these Wyrms.
Azteca – Huac Cries-Blood Rematch
Combined with the other leaders of the Crying Sky death cult, Skurkis and Yacate, Huac will try to take out the weakest on the team. Defend yourselves or you may end up the way of Azteca...
Khrysalis - Morganthe Rematch
You think you know Shadow magic? Find out against the Shadow Queen, Morganthe, where she takes you on by herself to show you what shadow can do.
Harvested Reagents Audit
Harvested reagents are the reagents that you pick up off the ground while exploring worlds. Since these are a big part of how Rematches are made, we thought we’d take this opportunity to improve the experience of collecting reagents. This audit includes two main components, acquisition and distribution.
Currently, harvested reagents are something that you may see as you’re questing and pick up on the occasion, but if you go out seeking to harvest many reagents, you can only get your hands on a few before you must wait for more to appear. Like with Cantrip Chests, we have reduced the respawn rate to 5 seconds, so once you pick one up, you can immediately start looking for the next one. This part is still in progress and will be ongoing across the next few updates, but for now you can see this in Wizard City and Avalon.
Distribution wise, there are some reagents you know where to find, but others that are more random and unpredictable. While some reagents like Cat Tail and Mist Wood will still show up in many worlds, with this audit, we have selected one reagent per world that will be exclusive to that world. Because of this, new reagents, Flax and Rose, have been added to Wizard City and Avalon respectively. This part is also in progress and will be in effect with the acquisition updates.
Tip: Did you know your pet can have an Adventure Power that harvests reagents for you and brings you back even more rewards?
Other Rematch Improvements
- Each world’s housing vendor now has the recipe to craft their world’s rematch
- Rematches are given as badge rewards after completing an Arc of worlds
- Level 170 versions of the gear available in Arc 1 rematches have been added to the Arc 2 rematches
COSMETIC ITEMS & RADIAL MENU
Expressing yourself can be hard. Sometimes the emotion you want to convey is buried in nested Setting menus and hard to access. Thus, we bring to you… the Radial Menu…
With a simple click of the scroll wheel or center mouse button (or by pressing SHIFT+E), you can have instant access to up to 40 emotes of your choice. Then either click the emote or tap a number key from 1-8 to play the effect.
Adding emotes to the wheel couldn’t be easier, thanks to the new Cosmetic Items Tab in your Spellbook. From here, you’ll be able to manage all your emotes, teleport effects and victory dances.
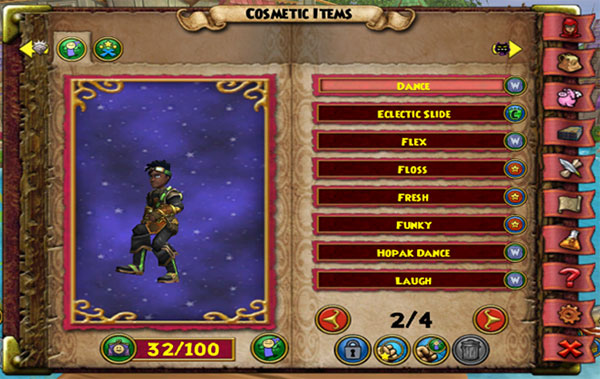
To add an emote to your wheel, simply click on its name, then the “Radial Menu” button:

And select a slot. Your Radial Menu has 5 pages of 8 slots to choose from:
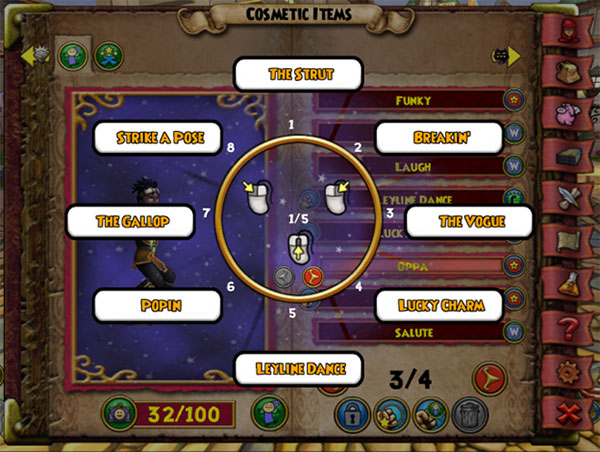
Victory Dances
Sick of seeing the same old victory dance after every battle? You can now equip up to 5 at a time and whenever you win a battle one of those 5 will be randomly selected. You can also now equip any emote as a victory dance. Click this button to see which dances you have equipped and swap them out:

Teleport Effects
Similarly, you can equip up to 5 teleports at a time, which will be randomly selected with each use.
Other Notes on the Cosmetic Inventory
This inventory can be accessed quickly with SHIFT+C. It has an item limit of 100 emotes and 100 teleport effects.
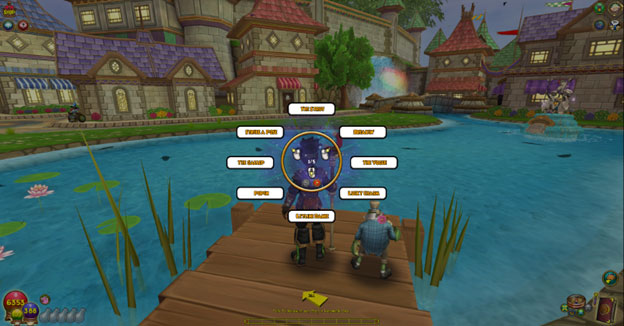
RECENT WIZARDS
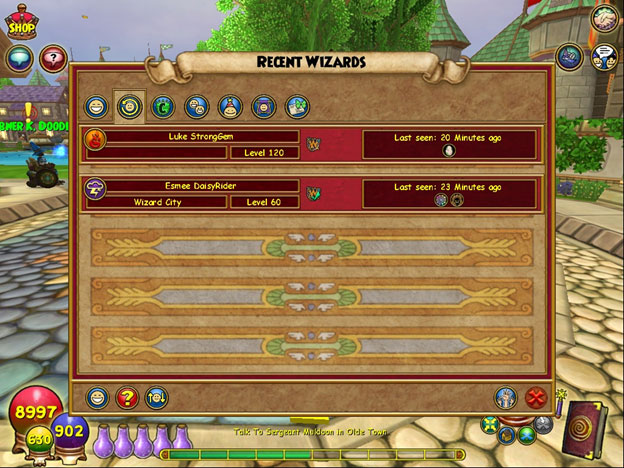
Recent Wizards are characters with whom you've recently shared an activity but aren't yet Friends. The activities can be fighting together in combat, exploring a dungeon, hatching a pet, playing on a Beastmoon team, playing derby, playing on a PVP team, or playing a housing game together. You may send Pixie Post messages to Recent Wizards and if they're online, you may chat with them or teleport to them. You can right click to inspect them.
Recent Wizards are sorted by the time that you last did something with them. Using the Sort Recent Wizards Button, you may filter them by the activity that you shared.
There is a setting option to disable Pixie Post Messages from Recent Wizards.
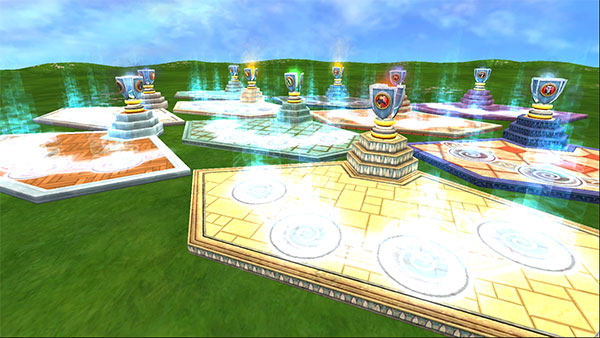
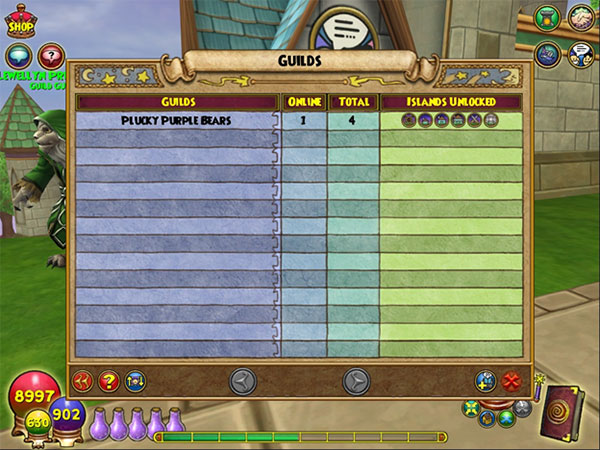
GUILD ACHIEVEMENTS
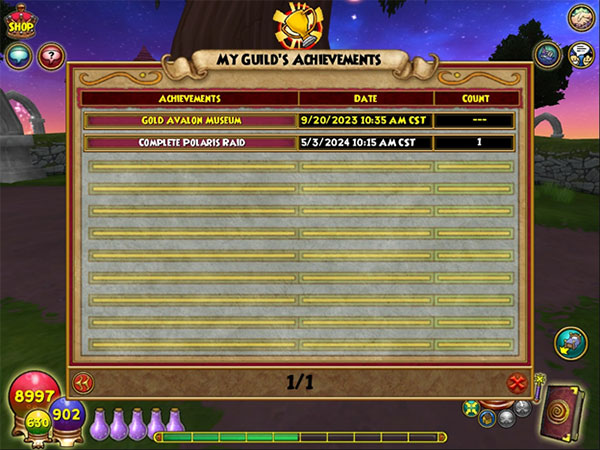
Tiering a gallery of the Guild Museum to gold or completing a Raid is a remarkable achievement! Both require a lot of time and dedication. We celebrate the guilds that have done these things!
Talk to Lewellyn Prideheart near the Guild Tree to view your Guild Achievements.
SOCIAL KIOSK IMPROVEMENTS
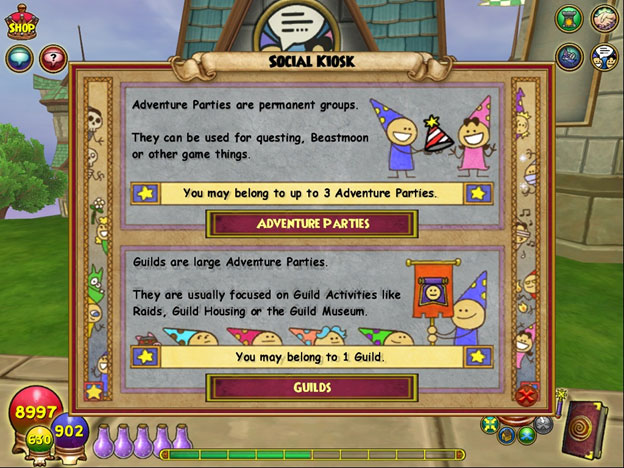
Check out the improvements we’ve made to the social kiosk!
- Adventure Parties may declare multiple purposes via a button in the Social Window.
- Adventure Party purposes are shown in the Social Kiosk.
- You may filter Adventure Parties by their purposes using a sort button.
- Guilds show the islands that they have unlocked.
- You may filter Guilds by their unlocked islands using a sort button.
- The process of requesting to join a guild or an adventure party has been cleaned up.
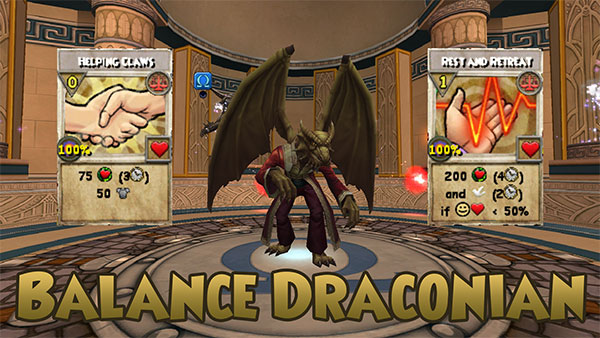
NEW BEASTMOON FORMS
Coming soon to a Beastmoon event near you, keep watch for these Beastmoon forms!
Fire Wolf Warrior
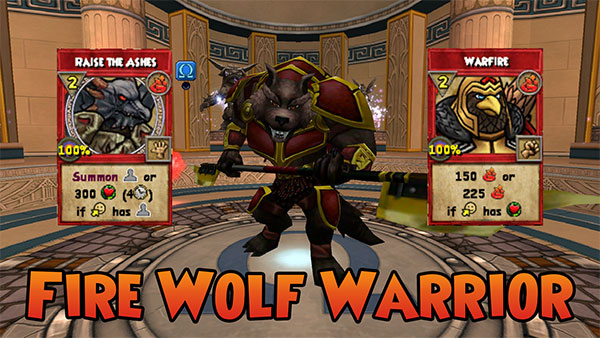
The Fire Wolf Warrior utilizes Heal Over Time effects to deal more damage. You’ll be best when paired up with a Life form, but Fire Wolf also has a minion that will help heal and be difficult for the enemies to defeat.
Balance Draconian
Balance Draconian combines Heal Over Time and Absorb effects to become one of the most powerful support forms in Beastmoon! Help keep your teammates alive and protected long enough to pull off a victory!
Death Minotaur
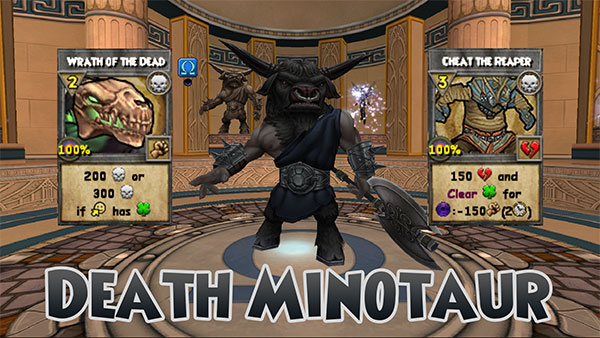
This Minotaur is final Death form of the original 10 statues. He gets to do all the things Death does best like drain health and weaken the opponents, but he also has the strongest offensive condition yet! Paired with a Storm form, this form can deal massive damage!
SCHOOL PIP GEN AND OTHER COMBAT CHANGES
School Pip Generation
School Pip generation is now determined by comparing your Archmastery stat against you opponents' Archmastery only. It no longer compares against your own teammates. Here’s an example:
Team 1
50 Rating: This player generates 2/3 every round
75 Rating: This player generates 1 every round
100 Rating: This player generates 1 every round
Team 2:
25 Rating: This player generates 1/4 every round
50 Rating: This player generates 1/2 every round
75 Rating: This player generates 3/4 every round
Advanced Combat Removals
Advanced Combat includes PvP, Raids, and Challenge Mode. The following spells have been removed from Advanced Combats...
- Stuns including stun-only spells and other spells with stun as a utility
- AoE Damage and DOT spells
Since these changes, the following combats have been modified...
- Unfun Guy – Voracious Void Raid
- Autloc – Crying Sky Raid
- All Arc 1 Rematch Challenge Modes
- Medulla Challenge Mode
- Titan’s Trident Challenge Mode
BUG FIXES AND OTHER CHANGES
Combat & Spells
- Ivan the Greater now spawns as expected
- Cyrus Drake was offering improper spell training... shame on him!
- Malus in Challenge Mode now drops pairs of spellements as expected
- Scion spells now have expanded Spell Inspect descriptions
- Bottom Path of Minotaur properly clears 4 shields
- Bottom Path of King Artorius – Myth properly creates Fire Traps against Fires in all situations
- Thunder Snake, Dark Sprite and Blood Bats’ bottom path has been modified
- New Arc 2 Bottom Path treasure cards are now available at the PvP Crafter, Guild PvP Crafter and Portal of Peril Crafter
Quests
- Pre-FTUE players should now get the Library Dues book quest in Wizard City
- Private Quinn temporarily went missing in Firecat Alley! He’s been found and now has returned to duty
- Several quest lights are now defaulted to being On
- Various other quest light fixes
- Sigil access in Sultana’s place can now be repeated after finishing quest
- Various other sigil fixes
- Off the Map Doodlemap clues are now in the right spots
Housing & Guilds
- There are now one and a half hour versions of Raid Keys
- There are now Gate Keys that can take you to Gold Skeleton Key Bosses!
- The Juggernaut Crab Theater table now has a collision boundary
- Regal Castle Blocks now support 15 wallpapers and 15 tiles per area.
- Several bugs with Regal Castle Blocks have been fixed.
Crafting & Events
- Portal of Peril event now has a progress bar with Fortune Coins
- Added 5 new Gauntlets for Portal of Peril for a total of 6
- Several improvements to the Beastmoon UI
- You can now click on your pet while playing as the pet
- Badge Leaderboard should no longer show duplicate entries
- Added recipes for Level 50 and 100 gear and pins to crafting stations in Arcs 1 and 2
- Badge Leaderboard has been moved to Olde Town
- Social Systems + Invite-a-Friend
- You can now create an Adventure Party with 2 players in a group.
- New information added to Invite-a-Friend
- Invite-a-Friend tab added to the Social Window
- Social Kiosk UI revamped
Crown Shop
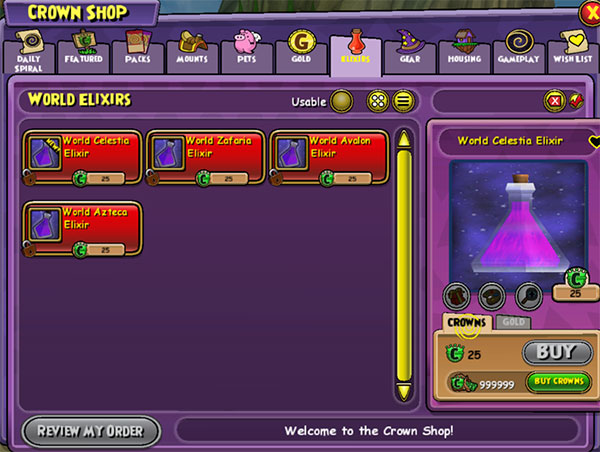
- World Skip Elixirs now for Zafaria and Avalon in the Crown Shop.
- The dinosaurs in Azteca are refusing to be skipped, this one will not make it to live right away.
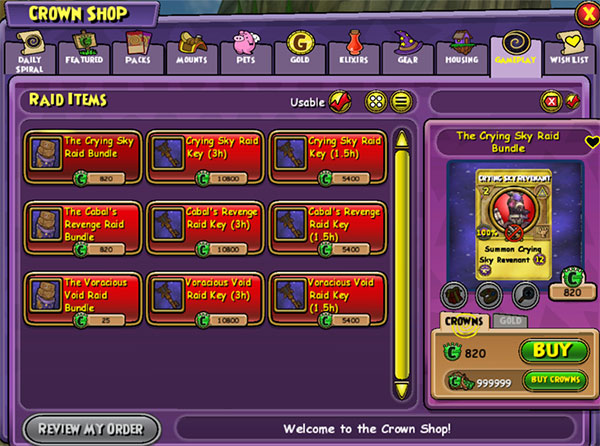
Raid Bundles and Keys for all 3 raids added to new Raid section of the Crown Shop. Raid items will not all appear on the live realm but will become available over time.
Extra Misc
- Lots and lots of Shop and other building Light fixes
- Various UI corrections and improvements to dialog text
- Several animation fixes
| | | | |
| | | | | |
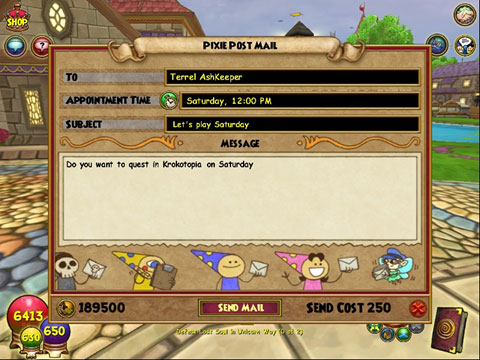
PIXIE POST
Here at Kingsisle we’ve been training Pixies to deliver messages. Every time they deliver a message successfully, we reward them with Pixie Stick snacks. It wasn’t easy (pesky Pixies!), but after years of training they’re finally ready to be released into the Spiral!
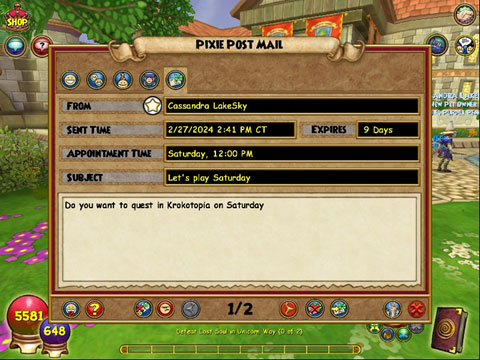
To send a message to a friend, click on the Send Mail button in the Character Inspect Window!
The Compose Message window allows you to type a Subject and Message for your Pixie Post. You may also select an optional Appointment Time. The Appointment Time is automatically converted to the receiver’s time zone. The Pixies charge 250 gold to deliver a message (so they can buy more Pixie Sticks).
- You can’t send messages to players with only menu chat.
- Both the Subject and the Message text must be acceptable for filtered chat.
- What you type in Pixie Post is treated as if you typed it in chat. If you wouldn’t say it in chat, don’t say it in Pixie Post. The Pixies are easily offended.
- You may paste text into Pixie Post.
- Each character may send up to 6 Pixie Post messages a day.
A new Pixie Post tab in the Social Window displays your Pixie Post messages.
- Messages expire 10 days after they’re delivered.
- You may delete messages anytime with the Delete Mail button.
- You may reply to the message by clicking the Reply button.
- There is also a button to ignore the character that sent the message. Ignoring a character will mean that you are no longer friends with that wizard.
- If you think the message is objectionable, there is a report button. Don’t report messages without cause: we take false reporting seriously.
Anyone in a Guild or Adventure Party may send a Pixie Post message by clicking on a fellow wizard’s name in the roster.
Players with the Messenger permission in a Guild may send Pixie Post messages to everyone with Filtered Chat or Open Chat in the Guild.
Anyone in an Adventure Party may send Pixie Post messages to everyone in the Party with Filtered Chat or Open Chat in the Adventure Party.
Finally, when you receive a new message a notification appears on the left side of the screen and the Social Window Button changes to show you have a new message.
THE FORBIDDEN LIBRARY GAUNTLET
Deep beneath Aquila's cobblestones lies a library of unstable magic, hidden away for containment and protection. But knowledge is like the moon--it cannot be hidden forever. A bibliomancer, enticed by promises of great power within the ancient library, has traveled to Aquila to steal its secrets for himself. Track the bibliomancer through the Forbidden Library, solving puzzles and battling its ancient defenders, in order to stop him from absconding with the library's sacred treasure.
This year, the housing gauntlet offers more than just combat; we’ve incorporated a few puzzles as well. Please submit all your feedback so we can make sure these puzzles are clear and fun!
Some details on the Library:
- There are 4 main puzzle rooms – each with a combat state and a puzzle state that is randomly selected when you enter the sigil. This means each run will feature a different combination of puzzles and enemies to fight. Play the gauntlet multiple times to try them all.
- There is one central puzzle that must be solved in every run, but the answer isn’t the same each time.
- You may notice some placeholder art in the library and during two boss fights. We’re aware of this and it will be resolved before the gauntlet is available on Live Realm.
The Forbidden Library Gauntlet Recipe can be found in the housing tab of Lloyd FallingWater in the Shopping District.
The Forbidden Library Gauntlet will not be immediately available in-game at launch but a short while later in a patch update.
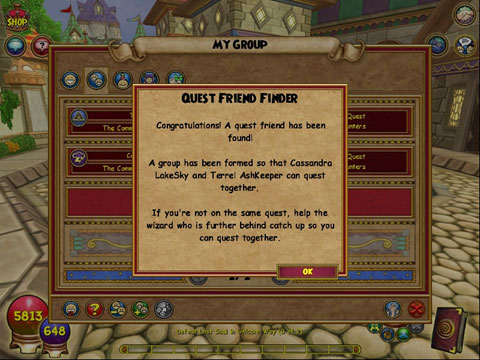
QUEST FRIEND FINDER
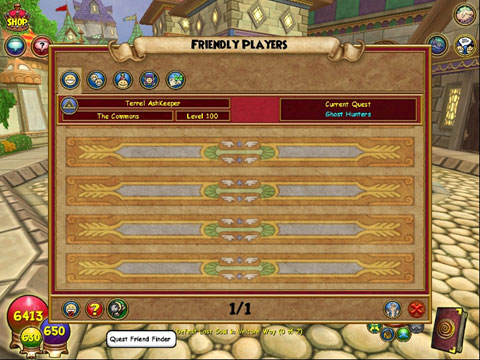
We think Wizard101 is more fun when you play with friends. But what if your friends aren’t playing right now? Quest Friend Finder is a way to find new friends.
The button to start Quest Friend Finder can be found on the Friendly Players tab of the Social Window.
- First, if you’re not already a Friendly Player, you will asked to become a Friendly Player. You must be a Friendly Player to use Quest Friend Finder.
- Quest Friend Finder asks other Friendly Players in your world if they would like to join you for questing.
- If they say yes, you are added to a group with them, and they are teleported to you. If you’re not on the same quest, help the wizard who is further behind catch up so you can quest together.
- You may turn off Quest Friend Finder by clicking the button again or it will automatically turn off if your group is full or if you teleport to a different world.
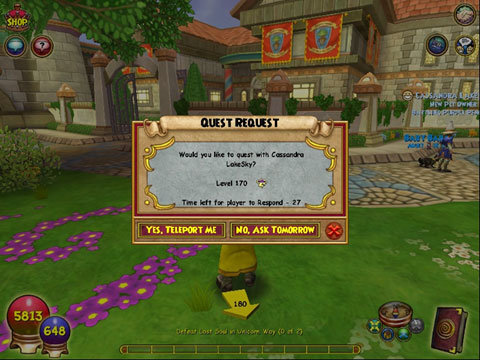
If you’re a Friendly Player, you will occasionally be asked if you would like to join another wizard for questing. These are your options:
- Yes, Teleport Me – You are added to a group with the player looking for Quest Friends and teleported to them.
- No, Ask Tomorrow – Don’t ask me again for 24 hours.
- The Quest Request window times out after 30 seconds. When this happens, you won’t be asked again for 1 hour.
- If you close the Quest Request window by clicking the red X, you won’t be bothered again for 6 hours.
The fine print:
- Players you have Ignored won’t be asked to be Quest Friends.
- Players who are busy with a PVP or Beastmoon match or other activities won’t be asked.
- We look for players who are closest to your level first.
SPELL CARD INSPECT
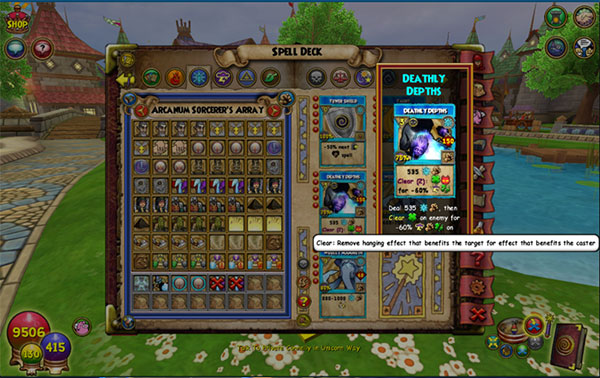
Over the years combat has grown a lot in complexity--and with it have our spell descriptions. With numerous effects that vary from spell to spell, it's important that players have full understanding of the cards they hold in their hand to make meaningful actions during combat. In this Spring update, we introduce an important new quality of life feature, Spell Card Inspection.
In most spell menus outside of combat (such as your Spell Deck, Gear Inspect, the Spellwrighting page, and more), you can now CTRL-Left Click OR Right Mouse Click on a card to open the Spell Inspect menu for additional details. By default, the inspect menu will show the same description that appears on the card. From there, you can hover your mouse over the icons and action verbs to view the name and definition of each effect.
The most complex spells will have expanded descriptions when inspected, providing more information about their effects than we can display on the card. In this update, the Novus world spell spellwrighting tiers have expanded descriptions, and many more spells will be getting expanded descriptions in groups over time in future updates.
Speaking of spell updates over time--As new icons and actions were introduced to the game, inconsistencies emerged across new and older spells. Does your card say, "to all enemies", use the All Enemies icon, or is of card type AoE? Eventually, these will all look the same! Just like the expanded spell inspect descriptions, card descriptions will be standardized in groups over time in future updates, utilizing our updated icon lexicon to get as consistent as possible. We have thousands of spells in our library, so please bear with us as we gradually complete this task!
BADGE IMPROVEMENTS
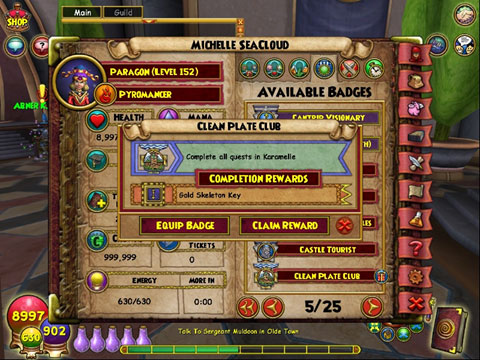
Badges, everyone loves badges, and now we’re making them more achievable and rewarding than ever!
- Badge Rewards – Some badges now have rewards. An icon on the badge indicates that you have a reward to claim. Click on the badge and then click the Claim Reward Button.
- Extra Credit Badges – Many existing badges have now been marked as “Extra Credit”. This means these badges no longer count towards your total badge completion on any category. Badges with this mark include any that are retired, leaderboard based, or take too long to acquire. You will still be able to equip and earn these badges. You can find Extra Credit Badges with a purple background in a new Extra Credit category as well as their regular category.
- Overcounting Badges – Badges with a count like Beastmoon Hero or Undead Executioner will now keep counting even after you earn the badge with the highest count. Some overcounted badges may also have a recurring reward you can claim.
- Player Inspect – Ever see someone wear a super cool badge that you wish you had like “One in a Million?” Now when you click on a player, there’s an icon on the bottom right that will show you the badge description of the badge they’re displaying.
- New Badge Category – A New Badges category contains all the badges you’ve earned in the last day.
- Equipping a badge – Equipped badges now display a fist icon.
- New Badge Notifications – When you earn a new badge, a New Badge Notification is displayed on the left side of the screen.
- Badge shortcuts – The Angler's Tome, Pet Tome, Beast Form Upgrades, PvP League Window, Castle Tours and the Monstrology Tome now have a button shortcut to their badge category.
- Badge Leaderboard – Have you ever wondered which characters have earned the most badges? Visit Gold Cap in the Arcanum and find out.
In addition to all these wonderful system improvements, all 1000+ Badges now have been cleaned up such that badges that were missing descriptions now have them, badge descriptions have been standardized, icons have been fixed, display orders have been standardized, and much more. There are also a handful of new badges to earn!
ARC 2 SPELLEMENTS
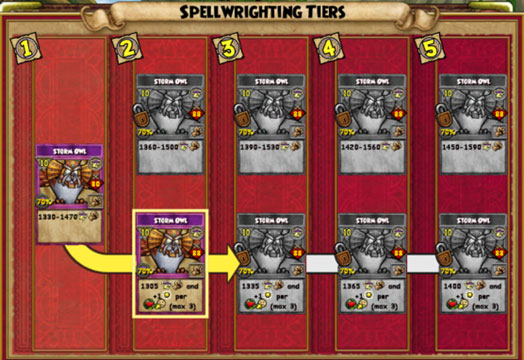
Arc 2 Spellements are here! Each world from Celestia to Khrysalis now has an associated spell that can be upgraded via the spellement system!
- Celestia – 7-pip (Ex: Fire Dragon)
- Zafaria – 8-pip (Ex: Medusa)
- Avalon – 9-pip (Ex: Wooly Mammoth)
- Azteca – 10-pip (Ex: Avenging Fossil)
- Khrysalis – King Artorius
These spells’ Spellwrighting pages include a top path that retains the spells classic functionality and a bottom path that adds a new twist to the spells with many powerful effects! These spellements can be acquired by wizards of any level using all the regular methods including:
- Pet Retriever Adventure Powers
- Cantrip Chests
- Main and Side quest rewards
- Crying Sky Raid
- Various Bosses throughout Arc 2 Worlds, now available to any level!
Scales of Knowledge
Both Arc 1 and Arc 2 spellements can be obtained from select boss encounters by higher level wizards using the new Scales of Knowledge. After entering, you’ll find a Scales object near the entrance of an encounter and interact with it to gain a temporary level scaling effect. While level scaled, you will only be able to use spells of the appropriate level and your stats will be lowered to compensate. Defeat the encounter’s boss before the effect runs out to get normally restricted loot drops including spellements.
Encounters with Scales of Knowledge support:
- Temple of Storms - Krokotopia
- Big Ben - Marleybone
- Jade Palace - MooShu
- The Final Countdown - Dragonspyre
- Trial of the Spheres - Celestia
- Mirror Lake – Zafaria
- Keep of Ganelon - Avalon
- Xibalba - Azteca
- Shadow Palace - Khrysalis
Cross-Training
In addition to their spellemental makeover, the Arc 2 spells are now cross-trainable! Check out the appropriate Ravenwood school Professors to train these spells. Furthermore, the Advanced mode-only spells have been removed from these Professors and added to Diego the Duelmaster in Unicorn way outside of the Duel Arena. Other notable changes are as follows:
- Rank 10 spells can now be acquired at level 80 rather than level 88
- Players of the appropriate school can still acquire their main school’s spells via spell quests at an earlier level than they can acquire them at the school Professors.
- You will be required to train the associated spells before you can upgrade their tier via spellements
Selected Target Effect Spells
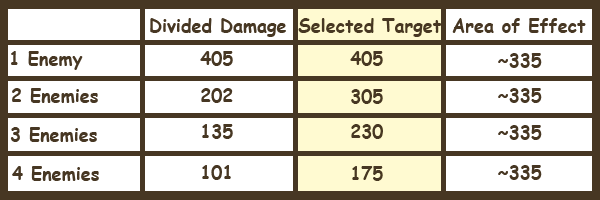
Bottom paths of AoE spells now work in a new way. This will NOT affect any existing spell for Standard PvE. Similar to the divided damage targeting, players can select the number of targets for their selected target spell, and the spell will then affect only the selected players. These spells have a bit less damage than a single-target counterpart for one target, then with each additional target, the damage goes down in a non-linear decline. Here’s an example comparison using Tier 2 Meteor Strike...
Other Spellements
Arc 2 spells aren't the only spells that get to join in the spellemental fun. Several other spells, including the new Wallaru spells and some Events pells, have also received additional paths with more to come in future milestone updates!
Extract Equine
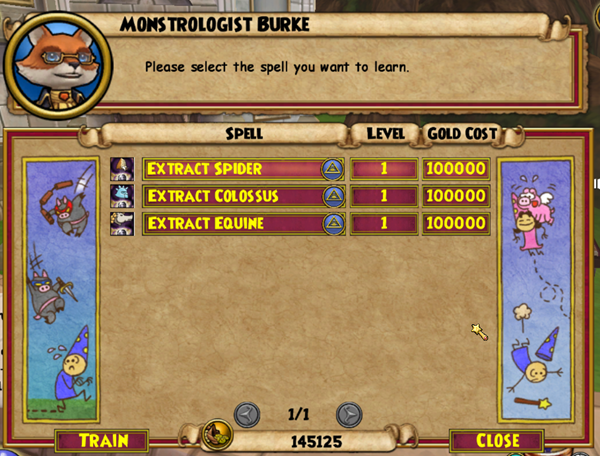
Monstrologist Burke has been busy researching a brand-new spell for you to learn Extract Equine! This extract allows wizards to extract Horses, Unicorns, Zebras, Centaurs, and other related species. Have fun exploring the spiral for new enemies to summon! You can train the spell in Ravenwood.
NEW BEASTMOON FORMS
Ice Ninja Pig
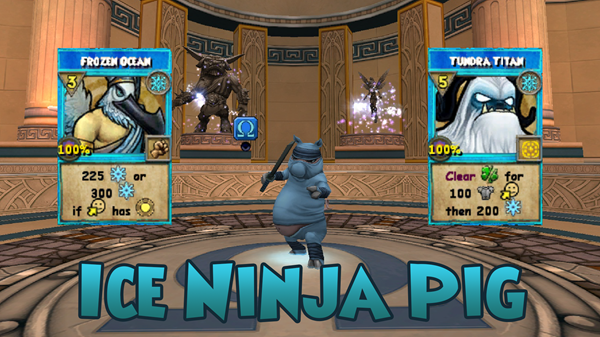
Ice Ninja Pig is more powerful when he has an Aura on and has some unique interactions that will help your team survive long enough to pull off a victory.
Storm Cyclops
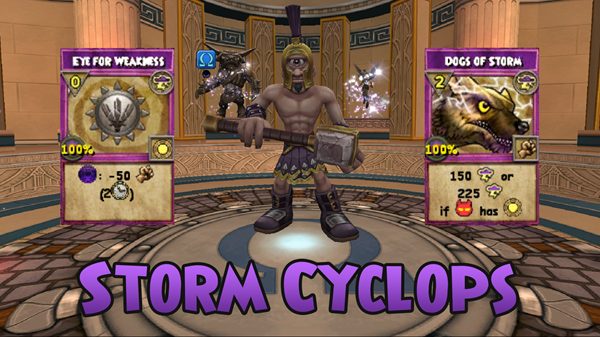
For the first time in any game mode, Storm Cyclops can cast Auras on the opponent. His in particular will reduce their outgoing damage, which is just one of the many methods this form uses to weaken his opponents while still able to dish out damage in the meantime.
ADVANCED CONTENT CHANGES
Several spells are now banned in advanced content:
- Banshee Top Path (tiers 2 and above)
- Hydra Top Path
- Sabertooth Top Path
- Avenging Fossil Top Path
- Efreet Top Path
- Sun Serpent Top Path
- Lord of Winter Top Path
- Spinysaur Top Path
- Medusa Top Path
- Basilisk Top Path
- Celestial Calendar Top Path
Other Changes:
- Numerous Bottom Path spell effects have been changed
- All protected Over Time spells have been converted to the new multiple creation format
- Spells that create multiple DoTs now resolve faster in combat
GUILD CHANGES
- The number of characters allowed in a Guild has been increased to 60.
- A Museum Appointment has been added to Guild Messages
- Picking up items in the Guild Conservatory will no longer pick up items on floors above you
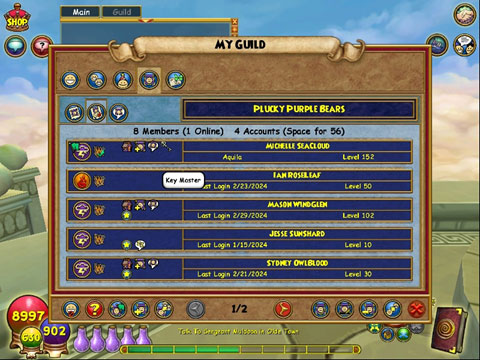
- A new Guild permission, Key Master, has been added. Only players with the Key Master permission can open Raid Gates and the Museum’s Prima Magnes.
- The Guild Cooldown now starts when you join a Guild instead of when you leave.
- If you’re not in a Guild and you have a Guild Cooldown, it’s displayed on the Guild Tab of the Social Window.
- A problem where if you collected exactly enough Prima Materia, you were unable to tier an exhibit, has been fixed.
- A message in the chat window will let you know when you’ve collected enough Prima Materia of a particular artifact.
- Players may now create a Guild at level 100.
- If a player logs out while they’ve been invited to create a Guild, the fizzle process has been cleaned up.
| | | | |
| | | | | | | | | | | | | | | | | | |
|
|

